Monday, September 23, 2019

Redefine tables online with DBMS_REDEFINTION

Online table redefinition allows you to restructure your Oracle® table in production without making the data unavailable. You might be comfortable using temp tables to move data around, but there is a better solution.

Introduction

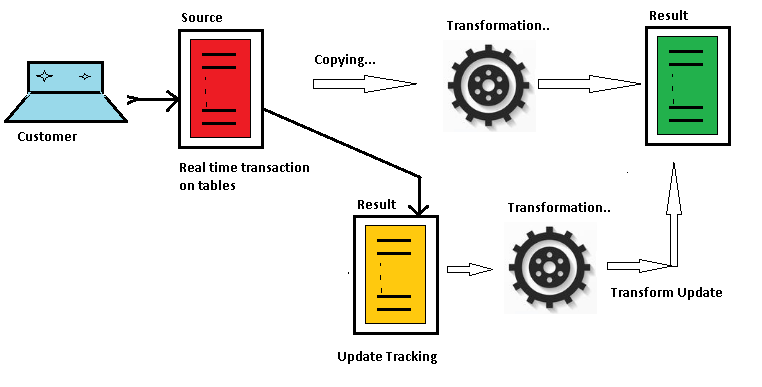
Staging the data and moving it around while you restructure your table makes both the table and the data unavailable for a certain period, which is a less than favorable situation for businesses. This is when the DBMS_REDEFINITION package saves the day, as shown in the following image:
Purpose

Periodically, you need to modify the logical or physical structure of an Oracle table for the following reasons:
  • To enhance queries or Data Manipulation Language (DML) performance
  • To accommodate application changes
  • To manage storage
Oracle Database provides a mechanism to make table structure modifications without significantly affecting the availability of the table, which is known as online table redefinition. Redefining tables online provides a substantial performance boost when compared to traditional methods of redefining tables.
When a table is redefined online, it is accessible to both queries and DML during most of the redefinition process. The table is locked in exclusive mode for only a short period, which is independent of the size of the table and the complexity of the redefinition. The redefinition process is completely transparent to users.
Online table redefinition requires free space that is approximately equivalent to the space currently used by the table being redefined.
There are numerous ways to reorganize a table. When downtime is a challenge, then the DBMS_REDEFINITION package is the best option for this task.

Redefine a table online

Use the following steps to redefine a table online.
  1. Choose the redefinition method, either by key or by rowids.
By key: Select a primary key or pseudo-primary key to use for the redefinition. Pseudo-primary keys are unique keys where all the component columns contain NOT NULL constraints. For this method, the versions of the tables before and after redefinition should consist of the same primary key columns. This is the preferred and default method of redefinition.
By rowid: Use this method if no key is available. In this method, a hidden column, named M_ROW$$, is added to the post-redefined version of the table. This column should be dropped or marked as unused after the redefinition is complete. If COMPATIBLE is set to 10.2.0 or higher, the final phase of redefinition automatically sets this column as unused. You can then use the ALTER TABLE ... DROP UNUSED COLUMNS statement to drop it. You cannot use this method on index-organized tables.
  1. Verify that the table can be redefined online by invoking the CAN_REDEF_TABLE procedure. If the table is not a candidate for online redefinition, then this procedure raises an error indicating why the table cannot be redefined online.
  2. Create an empty interim table (in the same schema as the table to be redefined) with all of the desired logical and physical attributes.
  3. It is not necessary to create the interim table with all the indexes, constraints, grants, and triggers of the table being redefined. This can be done automatically by using the COPY_TABLE_DEPENDENTS procedure.
  4. To improve performance in larger tables, you can set it in parallel by using the following commands:
    ALTER SESSION force parallel dml parallel degree-of-parallelism;
    
    ALTER SESSION force parallel query parallel degree-of-parallelism;
    
  5. The FINISH_REDEF_TABLE command completes the redefinition of the table. During this procedure, the original table is locked in an exclusive mode for a short time, independent of the amount of data in the original table. However, FINISH_REDEF_TABLE waits for all the pending DML operations to commit before completing the redefinition.
  6. If you used rowids for the redefinition and your COMPATIBLE initialization parameter is set to 10.1.0 or lower, you need to drop the hidden column M_ROW$$ that was added to the redefined table. You can also set the column to "UNUSED" by using the following command:
    ALTER TABLE <table_name> SET UNUSED (M_ROW$$);
    
If COMPATIBLE is 10.2.0 or higher, this hidden column is automatically set to UNUSED when the redefinition completes. You can then drop the column with the ALTER TABLE ... DROP UNUSED COLUMNS statement. Wait for any long-running queries against the interim table to complete and then drop the interim table.

Sample table redefinition

The following section shows examples of the various commands and outputs for a sample table redefinition.

START SQLPLUS

The following sample demonstrates starting sqlplus:
[oracle@vm215 ~]$ sqlplus amit/amit

SQL*Plus: Release 11.2.0.3.0 Production on Sat Oct 29 05:44:44 2016

Copyright (c) 1982, 2011, Oracle.  All rights reserved.


Connected to:
Oracle Database 11g Enterprise Edition Release 11.2.0.3.0 - 64bit Production
With the Partitioning, OLAP, Data Mining and Real Application Testing options

CREATE A DEMO TABLE

The following sample demonstrates creating a demo table name TEST1 under AMIT schema.
SQL> CREATE TABLE TEST1 ( ID        NUMBER(10) ,
                      ENAME     VARCHAR2(10),
                      SAL       NUMBER(10) ) ;

INSERT BULK ROWS

The following sample demonstrates inserting bulk rows and setting PPA_AGGGREGATE_TARGET in AMIT schema to max value.
SQL> INSERT INTO AMIT.TEST1 SELECT ROWNUM, 'T'|| ROWNUM,
DBMS_RANDOM.VALUE(100000, 999999) FROM DUAL CONNECT BY LEVEL < 1000000;

999999 ROWS CREATED.

SQL> COMMIT;

COMMIT COMPLETE.

CREATE DEPENDENT OBJECTS FOR TESTING

The following sample demonstrates creating dependent objects related to table TEST1 rows, so that you can see what happens during an online redefinition.
View creation
SQL> CREATE VIEW TEST1_VW AS SELECT * FROM TEST1 ;

VIEW CREATED.
Sequence creation
SQL> CREATE SEQUENCE TEST_SEQ ;

SEQUENCE CREATED.
Procedure creation
CREATE OR REPLACE PROCEDURE PROC1 (P_ID IN NUMBER)
   AS V_ID  NUMBER ;

BEGIN
  SELECT SAL
  INTO   V_ID
  FROM   TEST1
  WHERE  ID = P_ID;
END;
/

PROCEDURE CREATED.
DML trigger creation
SQL> CREATE OR REPLACE TRIGGER AMIT_TRIG
     BEFORE INSERT OR UPDATE ON TEST1
     FOR EACH ROW

DECLARE
      X       NUMBER;
BEGIN
     SELECT COUNT(*) INTO X
     FROM TEST1
     WHERE ID = :NEW.ID;
   IF X > 0 THEN
       RAISE_APPLICATION_ERROR(-20501, 'ID' || :NEW.ID || ' ALREADY EXISTS');
   END IF;
END;
/

TRIGGER CREATED.
Primary key creation
SQL> ALTER TABLE TEST1 ADD CONSTRAINT TEST1_ID_PK PRIMARY KEY (ID) ;

TABLE ALTERED.
Get the status before redefinition
SQL> COLUMN OBJECT_NAME FORMAT A20
    SELECT OBJECT_NAME, OBJECT_TYPE, STATUS FROM USER_OBJECTS ORDER BY OBJECT_NAME;SQL>

OBJECT_NAME          OBJECT_TYPE         STATUS
-------------------- ------------------- -------
AMIT_TRIG            TRIGGER             VALID
PROC1                PROCEDURE           VALID
TEST1                TABLE               VALID
TEST1_ID_PK          INDEX               VALID
TEST1_VW             VIEW                VALID
TEST_SEQ             SEQUENCE            VALID

6 ROWS SELECTED.

CHECK TABLE FOR REDEFINITION

The following sample demonstrates checking that the table can be redefined online using either rowids or primary key:
Using primary key
SQL> EXEC DBMS_REDEFINITION.CAN_REDEF_TABLE ('AMIT','TEST1',DBMS_REDEFINITION.CONS_USE_PK);

PL/SQL PROCEDURE SUCCESSFULLY COMPLETED.
Using rowid
SQL> EXEC DBMS_REDEFINITION.CAN_REDEF_TABLE ('AMIT','TEST1',DBMS_REDEFINITION.CONS_USE_ROWID);

PL/SQL PROCEDURE SUCCESSFULLY COMPLETED.

CREATE A REPLICA OF THE INTERIM TABLE

The following sample demonstrates creating a replica of new interim table without any dependent objects:
SQL> CREATE TABLE TEST1_REORG AS SELECT * FROM TEST1 WHERE ROWNUM=5 ;

TABLE CREATED.

SQL> SELECT COUNT(*) FROM TEST1_REORG ;

  COUNT(*)
 ----------
     0

SQL>  SELECT COUNT(*) FROM TEST1;

  COUNT(*)
 ----------
   999999

CONNECT TO DATABASE

The following sample demonstrates connecting by using a privilege user to execute the table redefinition task:
[oracle@vm215 ~]$ sqlplus / as sysdba

Sql*plus: release 11.2.0.3.0 production on sat oct 29 05:16:48 2016

Copyright (c) 1982, 2011, oracle.  All rights reserved.

Connected to:
Oracle database 11g enterprise edition release 11.2.0.3.0 - 64bit production
With the partitioning, olap, data mining and real application testing options

START REDEFINITION

The following sample demonstrates starting redefinition by using a primary key:
SQL> EXEC DBMS_REDEFINITION.START_REDEF_TABLE('AMIT','TEST1', 'TEST1_REORG');

PL/SQL PROCEDURE SUCCESSFULLY COMPLETED.

COPY DEPENDENT OBJECTS

The following sample demonstrates automatically copying dependent objects like mview, primary key, view, sequence, and triggers. IGNORE_ERROR is set to TRUE to avoid primary key violation with the COPY_TABLE_DEPENDENTS command.
SQL> DECLARE
      N PLS_INTEGER;
BEGIN
    DBMS_REDEFINITION.COPY_TABLE_DEPENDENTS('AMIT', 'TEST1','TEST1_REORG',
    DBMS_REDEFINITION.CONS_ORIG_PARAMS, TRUE, TRUE, TRUE, TRUE, N);
END;
/

PL/SQL PROCEDURE SUCCESSFULLY COMPLETED.

CHECK FOR ERRORS

The following sample demonstrates checking for errors in DBA_REDEFINITION_ERRORS view:
SQL> COL OBJECT_NAME FOR A25
SET LIN200 PAGES 200
COL DDL_TEXT FOR A60

SELECT OBJECT_NAME, BASE_TABLE_NAME, DDL_TXT
FROM DBA_REDEFINITION_ERRORS;

NO ROWS SELECTED

VALIDATE BOTH TABLES

The following sample demonstrates validating the row count on both tables and syncing with the interim table:
SQL> SELECT COUNT(*) FROM AMIT.TEST1_REORG ;

 COUNT(*)
----------
  999999

SQL> SELECT COUNT(*) FROM AMIT.TEST1 ;

 COUNT(*)
----------
  999999

SQL> EXEC DBMS_REDEFINITION.SYNC_INTERIM_TABLE('AMIT', 'TEST1', 'TEST1_REORG');

PL/SQL PROCEDURE SUCCESSFULLY COMPLETED.

FINISH THE REDEFINITION

The following sample demonstrates finishing the redefinition:
SQL> EXEC DBMS_REDEFINITION.FINISH_REDEF_TABLE ('AMIT', 'TEST1', 'TEST1_REORG');

PL/SQL PROCEDURE SUCCESSFULLY COMPLETED.

SQL> COLUMN OBJECT_NAME FORMAT A40
SELECT OBJECT_NAME, OBJECT_TYPE, STATUS
FROM DBA_OBJECTS
WHERE OWNER='AMIT';

OBJECT_NAME           OBJECT_TYPE         STATUS
--------------------- ------------------- -------
TEST1_VW              VIEW                INVALID
TEST_SEQ              SEQUENCE            VALID
PROC1                 PROCEDURE           VALID
TEST1                 TABLE               VALID
TEST1_REORG           TABLE               VALID
TEST1_ID_PK           INDEX               VALID
TMP$$_TEST1_ID_PK0    INDEX               VALID
TMP$$_AMIT_TRIG0      TRIGGER             INVALID
AMIT_TRIG             TRIGGER             INVALID

9 ROWS SELECTED.

CHECK ERROR AND RECOMPILE THE SCHEMA

The following sample demonstrates recompiling the schema with complete dependency, which is necessary because of the invalid triggers in the preceding step:
SQL> EXEC UTL_RECOMP.RECOMP_SERIAL('AMIT') ;

PL/SQL PROCEDURE SUCCESSFULLY COMPLETED.

SQL> SELECT OBJECT_NAME, OBJECT_TYPE, STATUS FROM DBA_OBJECTS WHERE OWNER='AMIT';

OBJECT_NAME                              OBJECT_TYPE         STATUS
---------------------------------------- ------------------- -------
TEST1_VW                                 VIEW                VALID
TEST_SEQ                                 SEQUENCE            VALID
PROC1                                    PROCEDURE           VALID
TEST1                                    TABLE               VALID
TEST1_REORG                              TABLE               VALID
TEST1_ID_PK                              INDEX               VALID
TMP$$_TEST1_ID_PK0                       INDEX               VALID
TMP$$_AMIT_TRIG0                         TRIGGER             VALID
AMIT_TRIG                                TRIGGER             VALID

9 ROWS SELECTED.

DROP THE INTERIM TABLE

The following sample demonstrates dropping the interim table:
SQL> DROP TABLE AMIT.TEST1_REORG;

TABLE DROPPED.

Conclusion

If a table structure needs to be modified and simultaneously accessed by end users, use DBMS_REFDEFINITION.
This feature helps reorganize the data without any downtime, thus avoiding challenges caused by downtime for customers in an online transaction processing (OLTP) environment.

Saturday, July 13, 2019

How to move ASM database files from one diskgroup to another ? (Doc ID 330103.1)

In this Document
Goal
Solution

APPLIES TO:

Oracle Database - Enterprise Edition - Version 11.2.0.4 and later
Information in this document applies to any platform.
***Checked for relevance on 03-Dec-2010***


GOAL

 MOVING  ASM DATABASE FILES FROM ONE DISKGROUP TO ANOTHER:

SOLUTION


The preferred way of doing the file movement amoung ASM DISKGROUPS is using RMAN. RMAN is critical to Automatic Storage Management and is responsible for tracking the ASM filenames and for deleting obsolete ASM files. Since ASM files cannot be accessed through normal operating system interfaces, RMAN is the preferred means of copying ASM file.


The steps involved in moving a datafile from a diskgroup to another is as given below.


1) Identify the data file to be moved.
2) Identify the diskgroup on to which the file has to be moved.
3) Take the file offline.
4) Copy the file to new diskgroup using Either RMAN or DBMS_FILE_TRANSFER.
5) Rename the file to point to new location.
6) Recover the file.
7) Bring the file online.
8) Verify the new file locations.
9) Delete the file from its original location.


1) Identify the data file to be moved.
 ----------------------------------------
         In database instance

         SQL:ORCL> SELECT FILE_NAME FROM DBA_DATA_FILES:

                            +ASMDSK2/orcl/datafile/users.256.565313879 <======= Move this to ASDSK1.
                            +ASMDSK1/orcl/sysaux01.dbf
                            +ASMDSK1/orcl/undotbs01.dbf
                            +ASMDSK1/orcl/system01.dbf

2) Identify the diskgroup on to which the file has to be moved.
--------------------------------------------------------------
      In ASM instance

          SQL:ASM> SELECT GROUP_NUMBER, NAME FROM V$ASM_DISKGROUP;

                           GROUP_NUMBER NAME
                             ------------ ---------
                                             1 ASMDSK1
                                             2 ASMDSK2


3) Take the file offline.
--------------------------

          SQL:ORCL> ALTER DATABASE DATAFILE '+ASMDSK2/orcl/datafile/users.256.565313879' OFFLINE;

 4)Now Copy the file from Source diskgroup ASMDSK1 to target Diskgroup ASMDSK2.
--------------------------------------------------------------------------------------------
   Either
      4. a)   DBMS_FILE_TRANSFER   package or
      4. b)   RMAN 
   can be used for this step.
       ( The step 5 to step 8  is based on the filenames  from method b).

       
        4.a).Using DBMS_FILE_TRANSFER package 
       
          
        SQL:ORCL>create or replace directory orcl1 as '+asmdsk1/orcl/datafile';
      
        SQL:ASM> Alter disgroup asmdsk2 add directory  '+asmdsk2/test';
      
        SQL:ORCL> create or replace directory orcl2 as '+asmdsk2/test';


        SQL:ORCL>
                BEGIN
                  DBMS_FILE_TRANSFER.COPY_FILE(
                  source_directory_object => 'ORCL1',
                  source_file_name => 'users.259.565359071',
                  destination_directory_object => 'ORCL2',
                  destination_file_name => 'USERS01.DBF');
                END;                            Database altered.
          4 b).Using RMAN copy the file to new diskgroup.

            $ rman target system@orcl10

            target database Password:
            connected to target database: ORCL (DBID=1089529226)

            RMAN>
            RMAN> COPY DATAFILE '+ASMDSK2/orcl/datafile/users.256.565313879' TO '+ASMDSK1';

                   Starting backup at 03-AUG-05
                   using target database controlfile instead of recovery catalog
                   allocated channel: ORA_DISK_1
                   channel ORA_DISK_1: sid=146 devtype=DISK
                   channel ORA_DISK_1: starting datafile copy
                   input datafile fno=00004 name=+ASMDSK2/orcl/datafile/users.256.565313879
                   output filename=+ASMDSK1/orcl/datafile/users.259.565359071 tag=TAG20050803T12110
                   9 recid=2 stamp=565359071
                   channel ORA_DISK_1: datafile copy complete, elapsed time: 00:00:03
                   Finished backup at 03-AUG-05
5) Rename the file to point to new location.
-------------------------------------------
          If you have used DBMS_FILE_TRANSFER (method 4 a)) use the following command to rename:
             SQL:ORCL> ALTER DATABASE RENAME FILE '+ASMDSK2/orcl/datafile/users.256.565313879' TO
                                                                                               '+ASMDSK1/orcl/datafile/users.259.565359071'

                           Database altered.

      If you have used RMAN (method 4 b) use the following option of RMAN
                 RMAN run {
                                      set newname for datafile '+ASMDSK2/orcl/datafile/users.256.565313879'
                                                                        to '+ASMDSK1/orcl/datafile/users.259.565359071' ;
                                    switch datafile all;
                                    }

6) Recover the file.
-------------------
           SQL:ORCL> RECOVER DATAFILE '+ASMDSK1/orcl/datafile/users.259.565359071'
                             Media recovery complete.

7) Bring the file online.
-----------------------
             SQL:ORCL>ALTER DATABASE DATAFILE '+ASMDSK1/orcl/datafile/users.259.565359071' ONLINE

                                 Database altered.

8) Verify the new file location.
---------------------------------
           SQL:ORCL> SELECT FILE_NAME FROM DBA_DATA_FILES;

                    FILE_NAME
                   -------------------------------------------------------------------------------
                  +ASMDSK1/orcl/datafile/users.259.565359071
                  +ASMDSK1/orcl/sysaux01.dbf
                  +ASMDSK1/orcl/undotbs01.dbf
                  +ASMDSK1/orcl/system01.dbf
9) Delete the file from its original location either per SQLPLUS or per ASMCMD:
   e.g.: SQL:ASM> ALTER DISKGROUP ASMDSK2 DROP FILE users.256.565313879;
   or:   ASMCMD> rm -rf <filename>

      Note:
      Most Automatic Storage Management files do not need to be manually deleted because, as Oracle managed files, they are removed automatically when they are no longer needed.

      However, if you need to drop an Oracle Managed File (OMF) manually you should use the fully qualified filename if you reference the file. Otherwise you will get an error (e.g. ORA-15177).

   e.g.: SQL:ASM> ALTER DISKGROUP ASMDSK2 DROP FILE '+ASMDSK2/orcl/datafile/users.256.565313879';
Note: The steps provided above assume that the database is open and in Archivelog mode.
         Besides these steps are not appropriated for system or sysaux datafiles. For System and Sysaux an approach similar to the one given below can be used:
   1. Create a Copy of datafile in target Diskgroup:

       RMAN> backup as copy tablespace system format '<New DG>';
       RMAN> backup as copy tablespace sysaux format '<New DG>';

   2. Then shutdown the database and restart to a mounted state

      RMAN> shutdown immediate;
      RMAN> startup mount;

   3. switch the datafiles to the copy

      RMAN> switch tablespace system to copy;
      RMAN> switch tablespace sysaux to copy;

   4. Recover the changes made to these tablespaces;

      RMAN> recover database;

-------------
Also make sure you run RMAN crosscheck copy and delete expired copy to update the controlfile and catalog for your backups to run without issues.

Friday, May 24, 2019

Exact Steps To Migrate ASM Diskgroups To Another SAN/Disk-Array/DAS/etc Without Downtime. (Doc ID 837308.1)

In this Document

Goal
 Ask Questions, Get Help, And Share Your Experiences With This Article
Solution
References

Applies to:

Oracle Database Cloud Schema Service - Version N/A and later
Oracle Database Exadata Cloud Machine - Version N/A and later
Oracle Cloud Infrastructure - Database Service - Version N/A and later
Oracle Database Cloud Exadata Service - Version N/A and later
Oracle Database Backup Service - Version N/A and later
Information in this document applies to any platform.

Goal


The present document explains in detail the exact steps to migrate ASM diskgroups from one SAN/Disk-Array/DAS/etc to another SAN/Disk-Array/DAS/etc without a downtime. This procedure will also work for diskgroups hosting OCR and Votefiles and ASM spfile.
Note: These steps are applicable to External, Normal & High redundancy diskgroups.

Ask Questions, Get Help, And Share Your Experiences With This Article

Would you like to explore this topic further with other Oracle Customers, Oracle Employees, and Industry Experts?

Click here to join the discussion where you can ask questions, get help from others, and share your experiences with this specific article.
Discover discussions about other articles and helpful subjects by clicking here to access the main My Oracle Support Community page for Database Install/Upgrade.

Solution

If your plans are replacing the current disks associated to your diskgroups with a new storage, this operation can be accomplished without any downtime, so you can follow the next steps

1) Backup all your databases and valid the backup (always required to protect your data).

2) Add the new path (new disks from the new storage) to your asm_diskstring to be recognized by ASM:

Example:
SQL> alter system set asm_diskstring = '/dev/emcpowerc*' , '/dev/emcpowerh*';

Where: '/dev/emcpowerc*' are the current disks.
Where: '/dev/emcpowerh*' are the new disks.

3) Confirm that the new disks are being detected by ASM:
SQL> select path from v$asm_disk;

4) Validate all the new disks as described in the following document:
 
How To Add a New Disk(s) to An Existing Diskgroup on RAC Cluster or Standalone ASM Configuration (Best Practices). (Doc ID 557348.1)
 
5) Add the new disks to your desired diskgroup:
SQL> alter diskgroup <diskgroup name> add disk
‘<new disk 1>’,
‘<new disk 2>’,
‘<new disk 3>’,
‘<new disk 4>’,
.
.
.
‘<new disk N>’ rebalance power <#>; 


6) Then wait until the rebalance operation completes:
SQL> select * from v$asm_operation;
SQL> select * from gv$asm_operation;

7) Finally, remove the old disks:
SQL> alter diskgroup <diskgroup name> drop disk
<disk name A>,
<disk name B>,
<disk name D>,
<disk name E>,
.
.
.
<disk name X>  rebalance power <#>;

8) Then wait until the rebalance operation completes:
SQL> select * from v$asm_operation;
SQL> select * from gv$asm_operation;


9) Done, your ASM diskgroups and database have been migrated to the new storage.

Note: Alternatively, we can execute add disk & drop disk statements in one operation, in that way only one rebalance operation will be started as follow:
SQL> alter diskgroup <diskgroup name>
add disk '<new device physical name 1>', .., '<new device physical name N>'
drop disk <old disk logical name 1>, <old disk logical name 2>, ..,<old disk logical name N>
rebalance power <#>;

This is more efficient than separated commands (add disk & drop disk statements).

Note 1: On 10g, a manual rebalance operation is required to restart the diskgroup rebalance and expel the disk(s) because on 10g (if something wrong happens on disk expelling, e.g. hanging) ASM will not restart the ASM rebalance automatically (this was already enhanced on 11g and 12c), therefore you will need to restart a manual rebalance operation as follows:
SQL> alter diskgroup <diskgroup name> rebalance power 11;


Note 2: Disk from the old SAN/Disk-Array/DAS/etc are finally expelled from the diskgroup(s) once the rebalance operation (from the drop operation) completes and when HEADER_STATUS = FORMER is reported thru the v$asm_disk view.
 

The window below is a live discussion of this article (not a screenshot).  We encourage you to join the discussion by clicking the "Reply" link below for the entry you would like to provide feedback on.  If you have questions or implementation issues with the information in the article above, please share that below.


Exact Steps to Migrate ASM Diskgroups to Another SAN/Disk-Array/DAS/Etc without Downtime (When ASMLIB Devices Are Involved) (Doc ID 1918350.1)

In this Document

Goal
Solution
 Community Discussions
References

Applies to:

Oracle Database - Enterprise Edition - Version 10.2.0.1 to 12.1.0.2 [Release 10.2 to 12.1]
Oracle Database Cloud Schema Service - Version N/A and later
Oracle Database Exadata Cloud Machine - Version N/A and later
Oracle Cloud Infrastructure - Database Service - Version N/A and later
Oracle Database Exadata Express Cloud Service - Version N/A and later
Information in this document applies to any platform.

Goal


The present document explains in detail the exact steps to migrate ASM diskgroups (using ASMLIB devices) from one SAN/Disk-Array/DAS/etc. to another SAN/Disk-Array/DAS/etc. without a downtime. This procedure will also work for diskgroups hosting OCR, Vote files and ASM spfiles.

Note: These steps are applicable to External, Normal & High redundancy diskgroups.

Solution


If you need to migrate and to replace the current ASMLIB disks associated to your diskgroups to a new storage, then you can perform this operation without any downtime, therefore you can follow the next steps:

1) Backup all your databases and valid the backup (it is always required to protect your data).


2) Create new ASMLIB devices on the new storage physical disks as described in the following document/demo:
White Paper: ASMLIB Installation & Configuration On MultiPath Mapper Devices (Step by Step Demo) On RAC Or Standalone Configurations. (Doc ID 1594584.1)

Example:

2.1) Create the new ASMLIB disks using the “/etc/init.d/oracleasm createdisk” command as root OS user:
 

# /etc/init.d/oracleasm    createdisk       ASMDISK_NEW_SAN_1    /dev/mapper/mpathbp1
# /etc/init.d/oracleasm    createdisk       ASMDISK_NEW_SAN_2    /dev/mapper/mpathcp1
# /etc/init.d/oracleasm    createdisk       ASMDISK_NEW_SAN_3    /dev/mapper/mpathdp1
# /etc/init.d/oracleasm    createdisk       ASMDISK_NEW_SAN_4    /dev/mapper/mpathep1
# /etc/init.d/oracleasm    createdisk       ASMDISK_NEW_SAN_5    /dev/mapper/mpathfp1
# /etc/init.d/oracleasm    createdisk       ASMDISK_NEW_SAN_6    /dev/mapper/mpathgp1
# /etc/init.d/oracleasm    createdisk       ASMDISK_NEW_SAN_7    /dev/mapper/mpathhp1
# /etc/init.d/oracleasm    createdisk       ASMDISK_NEW_SAN_8    /dev/mapper/mpathip1
# /etc/init.d/oracleasm    createdisk       ASMDISK_NEW_SAN_9    /dev/mapper/mpathjp1
# /etc/init.d/oracleasm    createdisk       ASMDISK_NEW_SAN_10   /dev/mapper/mpathkp1
 
2.2) Scan the new ASMIB disks on all the other RAC nodes (on Standalone configurations the disks are implicitly scanned during the ASMLIB disk creation) as follows (as root OS user):


# /etc/init.d/oracleasm    scandisks
 
2.3) Make sure the new ASMLIB disks and old ASMLIB disks are present on all the RAC Cluster nodes or Standalone configurations as follows:
 

# /etc/init.d/oracleasm  listdisks

ASMDISK_NEW_SAN_1
ASMDISK_NEW_SAN_2
ASMDISK_NEW_SAN_3
ASMDISK_NEW_SAN_4
ASMDISK_NEW_SAN_5
ASMDISK_NEW_SAN_6
ASMDISK_NEW_SAN_7
ASMDISK_NEW_SAN_8
ASMDISK_NEW_SAN_9
ASMDISK_NEW_SAN_10

ASMDISK_OLD_SAN_1
ASMDISK_OLD_SAN_2
ASMDISK_OLD_SAN_3
ASMDISK_OLD_SAN_4
ASMDISK_OLD_SAN_5
ASMDISK_OLD_SAN_6
ASMDISK_OLD_SAN_7
ASMDISK_OLD_SAN_8
ASMDISK_OLD_SAN_9
ASMDISK_OLD_SAN_10
  
# /usr/sbin/oracleasm-discover 'ORCL:*'
Using ASMLib from /opt/oracle/extapi/64/asm/orcl/1/libasm.so
[ASM Library - Generic Linux, version 2.0.4 (KABI_V2)]

Discovered disk: ORCL:ASMDISK_NEW_SAN_1 [40017852 blocks (20489140224 bytes), maxio 512]
Discovered disk: ORCL:ASMDISK_NEW_SAN_2 [40017852 blocks (20489140224 bytes), maxio 512]
Discovered disk: ORCL:ASMDISK_NEW_SAN_3 [40017852 blocks (20489140224 bytes), maxio 512]
Discovered disk: ORCL:ASMDISK_NEW_SAN_4 [40017852 blocks (20489140224 bytes), maxio 512]
Discovered disk: ORCL:ASMDISK_NEW_SAN_5 [40017852 blocks (20489140224 bytes), maxio 512]
Discovered disk: ORCL:ASMDISK_NEW_SAN_6 [40017852 blocks (20489140224 bytes), maxio 512]
Discovered disk: ORCL:ASMDISK_NEW_SAN_7 [40017852 blocks (20489140224 bytes), maxio 512]
Discovered disk: ORCL:ASMDISK_NEW_SAN_8 [40017852 blocks (20489140224 bytes), maxio 512]
Discovered disk: ORCL:ASMDISK_NEW_SAN_9 [40017852 blocks (20489140224 bytes), maxio 512]
Discovered disk: ORCL:ASMDISK_NEW_SAN_10 [40017852 blocks (20489140224 bytes), maxio 512]


Discovered disk: ORCL:ASMDISK_OLD_SAN_1 [40017852 blocks (20489140224 bytes), maxio 512]
Discovered disk: ORCL:ASMDISK_OLD_SAN_2 [40017852 blocks (20489140224 bytes), maxio 512]
Discovered disk: ORCL:ASMDISK_OLD_SAN_3 [40017852 blocks (20489140224 bytes), maxio 512]
Discovered disk: ORCL:ASMDISK_OLD_SAN_4 [40017852 blocks (20489140224 bytes), maxio 512]
Discovered disk: ORCL:ASMDISK_OLD_SAN_5 [40017852 blocks (20489140224 bytes), maxio 512]
Discovered disk: ORCL:ASMDISK_OLD_SAN_6 [40017852 blocks (20489140224 bytes), maxio 512]
Discovered disk: ORCL:ASMDISK_OLD_SAN_7 [40017852 blocks (20489140224 bytes), maxio 512]
Discovered disk: ORCL:ASMDISK_OLD_SAN_8 [40017852 blocks (20489140224 bytes), maxio 512]
Discovered disk: ORCL:ASMDISK_OLD_SAN_9 [40017852 blocks (20489140224 bytes), maxio 512]
Discovered disk: ORCL:ASMDISK_OLD_SAN_10 [40017852 blocks (20489140224 bytes), maxio 512]
  

3) Verify the ASM discovery string (“ASM_DISKSTRING”) is correctly pointing to the ASMLIB devices (in all the ASM instances) as follows:

3.1) RAC Cluster configurations:

+ASM1 instance:
 

[grid@dbaasm ~]$ . oraenv
ORACLE_SID = [+ASM1] ? +ASM1
The Oracle base remains unchanged with value /u01/app/grid
[grid@dbaasm ~]$ sqlplus "/as sysasm"

SQL*Plus: Release 11.2.0.3.0 Production on Mon Aug 18 18:39:28 2014

Copyright (c) 1982, 2011, Oracle.  All rights reserved.


Connected to:
Oracle Database 11g Enterprise Edition Release 11.2.0.3.0 - 64bit Production
With the Automatic Storage Management option

SQL> show parameter  ASM_DISKSTRING

NAME                                 TYPE        VALUE
------------------------------------ ----------- ------------------------------
asm_diskstring                       string      ORCL:*
 
+ASM2 instance:
 

[grid@dbaasm ~]$ . oraenv
ORACLE_SID = [+ASM2] ? +ASM2
The Oracle base remains unchanged with value /u01/app/grid
[grid@dbaasm ~]$ sqlplus "/as sysasm"

SQL*Plus: Release 11.2.0.3.0 Production on Mon Aug 18 18:39:28 2014

Copyright (c) 1982, 2011, Oracle.  All rights reserved.


Connected to:
Oracle Database 11g Enterprise Edition Release 11.2.0.3.0 - 64bit Production
With the Automatic Storage Management option

SQL> show parameter  ASM_DISKSTRING

NAME                                 TYPE        VALUE
------------------------------------ ----------- ------------------------------
asm_diskstring                       string      ORCL:*
 
3.2) Standalone configurations:

+ASM1 instance:


[grid@dbaasm ~]$ . oraenv
ORACLE_SID = [+ASM] ? +ASM
The Oracle base remains unchanged with value /u01/app/grid
[grid@dbaasm ~]$ sqlplus "/as sysasm"

SQL*Plus: Release 11.2.0.3.0 Production on Mon Aug 18 18:39:28 2014

Copyright (c) 1982, 2011, Oracle.  All rights reserved.


Connected to:
Oracle Database 11g Enterprise Edition Release 11.2.0.3.0 - 64bit Production
With the Automatic Storage Management option

SQL> show parameter  ASM_DISKSTRING

NAME                                 TYPE        VALUE
------------------------------------ ----------- ------------------------------
asm_diskstring                       string      ORCL:*
  

4) Then confirm that the new ASMLIB disks and old ASMLIB disks are being detected by ASM as follows:
 

ORACLE_SID = [+ASM] ? +ASM
The Oracle base remains unchanged with value /u01/app/grid
[grid@dbaasm ~]$ sqlplus "/as sysasm"

SQL*Plus: Release 11.2.0.3.0 Production on Mon Aug 18 18:39:28 2014

Copyright (c) 1982, 2011, Oracle.  All rights reserved.


Connected to:
Oracle Database 11g Enterprise Edition Release 11.2.0.3.0 - 64bit Production
With the Automatic Storage Management option


SQL> select path from v$asm_disk;

PATH
--------------------------------------------------------------------------------
ORCL:ASMDISK_NEW_SAN_1
ORCL:ASMDISK_NEW_SAN_2
ORCL:ASMDISK_NEW_SAN_3
ORCL:ASMDISK_NEW_SAN_4
ORCL:ASMDISK_NEW_SAN_5
ORCL:ASMDISK_NEW_SAN_6
ORCL:ASMDISK_NEW_SAN_7
ORCL:ASMDISK_NEW_SAN_8
ORCL:ASMDISK_NEW_SAN_9
ORCL:ASMDISK_NEW_SAN_10

PATH
--------------------------------------------------------------------------------
ORCL:ASMDISK_OLD_SAN_1
ORCL:ASMDISK_OLD_SAN_2
ORCL:ASMDISK_OLD_SAN_3
ORCL:ASMDISK_OLD_SAN_4
ORCL:ASMDISK_OLD_SAN_5
ORCL:ASMDISK_OLD_SAN_6
ORCL:ASMDISK_OLD_SAN_7
ORCL:ASMDISK_OLD_SAN_8
ORCL:ASMDISK_OLD_SAN_9
ORCL:ASMDISK_OLD_SAN_10

10 rows selected.
 
5) Validate all the new disks as described in the following document:
 
How To Add a New Disk(s) to An Existing Diskgroup on RAC Cluster or Standalone ASM Configuration (Best Practices). (Doc ID 557348.1)
  

6) Add the new disks to your desired diskgroup as follows:

SQL> alter diskgroup <diskgroup name> add disk
‘<new disk 1>’,
‘<new disk 2>’,
‘<new disk 3>’,
‘<new disk 4>’,
.
.
.
‘<new disk N>’ rebalance power <#>;


Example:
SQL> alter diskgroup DATA add disk
'ORCL:ASMDISK_NEW_SAN_1',
'ORCL:ASMDISK_NEW_SAN_2',
'ORCL:ASMDISK_NEW_SAN_3',
'ORCL:ASMDISK_NEW_SAN_4',
'ORCL:ASMDISK_NEW_SAN_5',
'ORCL:ASMDISK_NEW_SAN_6',
'ORCL:ASMDISK_NEW_SAN_7',
'ORCL:ASMDISK_NEW_SAN_8',
'ORCL:ASMDISK_NEW_SAN_9',
'ORCL:ASMDISK_NEW_SAN_10'  rebalance power 11;


6) Then wait until the rebalance operation completes:

SQL> select * from v$asm_operation;

no rows selected

SQL> select * from gv$asm_operation;

no rows selected


7) Finally, remove the old disks:
SQL> alter diskgroup <diskgroup name> drop disk
<disk name A>,
<disk name B>,
<disk name D>,
<disk name E>,
.
.
.
<disk name X>  rebalance power <#>;


Example:
SQL> alter diskgroup DATA drop disk
ASMDISK_OLD_SAN_1,
ASMDISK_OLD_SAN_2,
ASMDISK_OLD_SAN_3,
ASMDISK_OLD_SAN_4,
ASMDISK_OLD_SAN_5,
ASMDISK_OLD_SAN_6,
ASMDISK_OLD_SAN_7,
ASMDISK_OLD_SAN_8,
ASMDISK_OLD_SAN_9,
ASMDISK_OLD_SAN_10  rebalance power 11;


8) Then wait until the rebalance operation completes:
SQL> select * from v$asm_operation;

no rows selected

SQL> select * from gv$asm_operation;

no rows selected


9) After the old disks are completely expelled from the diskgroup(s), then your ASM diskgroup(s) and database(s) have been migrated to the new storage.

Note 1: Alternatively, we can execute add disk & drop disk statements in one operation, in that way only one rebalance operation will be started as follow:
SQL> alter diskgroup <diskgroup name>
add disk '<new device physical name 1>', .., '<new device physical name N>'
drop disk <old disk logical name 1>, <old disk logical name 2>, ..,<old disk logical name N>  rebalance power <#>;
 
Example:
alter diskgroup DATA add disk
'ORCL:ASMDISK_NEW_SAN_1',
'ORCL:ASMDISK_NEW_SAN_2',
'ORCL:ASMDISK_NEW_SAN_3',
'ORCL:ASMDISK_NEW_SAN_4',
'ORCL:ASMDISK_NEW_SAN_5',
'ORCL:ASMDISK_NEW_SAN_6',
'ORCL:ASMDISK_NEW_SAN_7',
'ORCL:ASMDISK_NEW_SAN_8',
'ORCL:ASMDISK_NEW_SAN_9',
'ORCL:ASMDISK_NEW_SAN_10'  
drop disk
ASMDISK_OLD_SAN_1,
ASMDISK_OLD_SAN_2,
ASMDISK_OLD_SAN_3,
ASMDISK_OLD_SAN_4,
ASMDISK_OLD_SAN_5,
ASMDISK_OLD_SAN_6,
ASMDISK_OLD_SAN_7,
ASMDISK_OLD_SAN_8,
ASMDISK_OLD_SAN_9,
ASMDISK_OLD_SAN_10  rebalance power 11;
  

This is more efficient than separated commands (add disk & drop disk statements).

Then wait until the rebalance operation completes:
  

SQL> select * from v$asm_operation;

no rows selected

SQL> select * from gv$asm_operation;

no rows selected
  

Note 2:  As a best practice, never execute the “/etc/init.d/oracleasm deletedisk” command on active ASMLIB disks (those which are currently being used by ASM diskgroups as disks members).

Note 3:  As a best practice, never execute the “/etc/init.d/oracleasm createdisk” command on active ASMLIB disks (those which are currently being used by ASM diskgroups as disks members).

Note 4:  Never remove/format/modify/overlap/resize (at OS level or hardware) the physical associated disk until the corresponding logical ASMLIB/ASM disk is completely dropped and expelled from the ASM diskgroup (in other words, until the rebalance operation completes).

Note 5: On 10g, a manual rebalance operation is required to restart the diskgroup rebalance and expel the disk(s) because on 10g (if something wrong happens on disk expelling, e.g. hanging) ASM will not restart the ASM rebalance automatically (this was already enhanced on 11g and 12c), therefore you will need to restart a manual rebalance operation as follows:
SQL> alter diskgroup <diskgroup name> rebalance power 11;

Wednesday, May 15, 2019

How to clone PDB ( Remote Clone ) across CDB using Database Link (Doc ID 2297470.1)

In this Document

Goal
Solution
References


Applies to:

Oracle Database Cloud Schema Service - Version N/A and later
Oracle Database Exadata Express Cloud Service - Version N/A and later
Oracle Database Exadata Cloud Machine - Version N/A and later
Oracle Cloud Infrastructure - Database Service - Version N/A and later
Oracle Database Backup Service - Version N/A and later
Information in this document applies to any platform.

Goal

This article provides an example by going through the the steps how to clone PDB from CDB to another CDB

Existing Database information:
Source Multitenant  Database : CDB1 with Pdb1 , Pdb2
Destination Multitenant Database : CDB2 with Pdb2

 Point to Note :
  During cloning pdb of source database should be READ ONLY. But from 12.2, Source PDB can be kept in READ WRITE mode also

Solution

Let we see how to clone pdb1 from cdb1 to cdb2 using remote link method.

Source Database: ( CDB1 )
SQL> select CON_ID, dbid, NAME, OPEN_MODE,open_time,create_scn from V$PDBS ORDER BY name;
CON_ID DBID             NAME           OPEN_MODE     OPEN_TIME                                      CREATE_SCN
---------- ---------- ------------------------------ ---------- ------------------------------------------------------------
2        3998669976    PDB$SEED     READ ONLY      08-AUG-17 06.02.49.899 PM +05:30      227
3        2537019739    PDB1            MOUNTED         08-AUG-17 06.09.57.759 PM +05:30      1965762
4        2868907633    PDB2            MOUNTED         08-AUG-17 06.11.14.177 PM +05:30      2018955

Destination Database ( CDB2)
SQL> select CON_ID, dbid, NAME, OPEN_MODE,open_time,create_scn from V$PDBS ORDER BY name;
CON_ID   DBID            NAME       OPEN_MODE OPEN_TIME                                       CREATE_SCN
---------- ---------- --------------- ---------- ------------------------------------------------------------------
2            3798668876 PDB$SEED READ ONLY   08-AUG-17 05.55.05.936 PM +05:30     227
4            2568907633 PDB2         MOUNTED     08-AUG-17 05.55.26.840 PM +05:30     3013955

Phase 1:  At Source Database: ( CDB1 )
 1.1 Create user at pdb which going to clone for this activity 
 1.2 Assign grants  'CREATE SESSION and CREATE PLUGGABLE DATABASE' to that user.

 To explain this case, i have created user, named 'remote_user_for_clone' 

Example:

At CDB1: 

SQL> ALTER SESSION SET CONTAINER=pdb1;

SQL> ALTER PLUGGABLE DATABASE pdb1 open;

SQL> CREATE USER remote_user_for_clone identified by remote_user_for_clone;

SQL> GRANT CREATE SESSION, CREATE PLUGGABLE DATABASE TO remote_user_for_clone;

SQL> ALTER PLUGGABLE DATABASE pdb1 close;

SQL> ALTER PLUGGABLE DATABASE pdb1 open read only; 

Phase-2
Create net service name ( tnsalias ) in tnsnames.ora of  Destination Database ( CDB2 ) server 
tnsnames.ora
~~~~~~~~~~
getpdb1 =
(DESCRIPTION =
(ADDRESS = (PROTOCOL = TCP)(Host = <Source_Database_ CDB1_host > )(PORT = 1521))
(CONNECT_DATA =
(SERVER = DEDICATED)
(SERVICE_NAME = pdb1)
)
)

Phase-3
At Destination Database  ( CDB2 )

From cdb$root
 3.1 Create database link using user which created for this activity 
 3.2 Create pluggable database using dblink. Optionally if folder structure of source and destination database are different then we can provide FILE_NAME_CONVERT parameter approprietely
 3.3 Open cloned pdb database at destination database.

SQL> CREATE DATABASE LINK getpdb_link CONNECT TO remote_user_for_clone identified by remote_user_for_clone using 'getpdb1';
SQL> create pluggable database pdb1new from pdb1@getpdb_link file_name_convert=('D:\ORADATA\dbcdb\DATA\pdb1\','D:\ORADATA\dbcdbaux\DATA\pdb1\');
SQL> alter pluggable database pdb1new open;             <======= to make read write from mount state


Note: We can test database  link prior to creation of pluggable database at Destination database
      Assuming we have below object at source ( CDB1) Database
             SQL> select count(*) from usrpdb1.allobj;
                  COUNT(*)
                 ----------
                   78779
      Provide "select on" privs on above object to user which we created at 1.1
                  SQL> GRANT CREATE SESSION, CREATE PLUGGABLE DATABASE , [ select on usrpdb1.allobj] TO remote_user_for_clone;
      Now, after database link creation, we can test the connectivity like below at Destination Database ( CDB2)
           ASQL> select count(*) from usrpdb1.allobj@getpdb_link;
                 COUNT(*)
                ----------
                 78779
            Above output implies , database link which we created works fine.

3.4  Verify and check the objects in pdb1new which cloned from source database
        SQL> alter session set container=pdb1new ;
        SQL> select username,password from dba_users;

 SQL> select CON_ID, dbid, NAME, OPEN_MODE,open_time,create_scn from V$PDBS ORDER BY name;
CON_ID DBID             NAME          OPEN_MODE        OPEN_TIME                                         CREATE_SCN
---------- ---------- ------------------- ---------- --------------------------------------------- ----------------------
2           3798668876 PDB$SEED    READ ONLY          08-AUG-17 05.55.05.936 PM +05:30            227
4           2568907633 PDB2            MOUNTED            08-AUG-17 05.55.26.840 PM +05:30            3013955
3           2156111281 PDB1NEW     READ WRITE        08-AUG-17 07.11.36.419 PM +05:30            2951277                     <<<<< Read write
SQL> select count(*) from usrpdb1.allobj;
COUNT(*)
----------
78779 

"OPTION WARNING Database option mismatch: PDB installed version NULL" in PDB_PLUG_IN_VIOLATIONS (Doc ID 2020172.1)

In this Document

Symptoms
Changes
Cause
Solution
References


Applies to:

Oracle Database - Enterprise Edition - Version 12.1.0.2 and later
Oracle Database Cloud Schema Service - Version N/A and later
Oracle Database Exadata Cloud Machine - Version N/A and later
Oracle Cloud Infrastructure - Database Service - Version N/A and later
Oracle Database Backup Service - Version N/A and later
Information in this document applies to any platform.

Symptoms


After converting a non-CDB to a PDB and running the noncdb_to_pdb.sql script, you see messages of this form in PDB_PLUG_IN_VIOLATIONS.  In this case, the PDB name is "<PDB> ".
<PDB> OPTION WARNING Database option APS mismatch: PDB installed version NULL. CDB installed version 12.1.0.2.0. PENDING Fix the database option in the PDB or the CDB
<PDB> OPTION WARNING Database option CATJAVA mismatch: PDB installed version NULL. CDB installed version 12.1.0.2.0. PENDING Fix the database option in the PDB or the CDB
<PDB> OPTION WARNING Database option CONTEXT mismatch: PDB installed version NULL. CDB installed version 12.1.0.2.0. PENDING Fix the database option in the PDB or the CDB
<PDB> OPTION WARNING Database option DV mismatch: PDB installed version NULL. CDB installed version 12.1.0.2.0. PENDING Fix the database option in the PDB or the CDB
<PDB> OPTION WARNING Database option JAVAVM mismatch: PDB installed version NULL. CDB installed version 12.1.0.2.0. PENDING Fix the database option in the PDB or the CDB
<PDB> OPTION WARNING Database option OLS mismatch: PDB installed version NULL. CDB installed version 12.1.0.2.0. PENDING Fix the database option in the PDB or the CDB
<PDB> OPTION WARNING Database option ORDIM mismatch: PDB installed version NULL. CDB installed version 12.1.0.2.0. PENDING Fix the database option in the PDB or the CDB
<PDB> OPTION WARNING Database option OWM mismatch: PDB installed version NULL. CDB installed version 12.1.0.2.0. PENDING Fix the database option in the PDB or the CDB
<PDB> OPTION WARNING Database option SDO mismatch: PDB installed version NULL. CDB installed version 12.1.0.2.0. PENDING Fix the database option in the PDB or the CDB
<PDB> OPTION WARNING Database option XML mismatch: PDB installed version NULL. CDB installed version 12.1.0.2.0. PENDING Fix the database option in the PDB or the CDB
<PDB> OPTION WARNING Database option XOQ mismatch: PDB installed version NULL. CDB installed version 12.1.0.2.0. PENDING Fix the database option in the PDB or the CDB
<PDB> APEX WARNING APEX mismatch: PDB installed version NULL CDB installed version 4.2.5.00.08 PENDING Please contact Oracle Support.

Changes

 You converted a non-CDB to a PDB.

Cause

 These messages mean that the option is not installed in the PDB, but is installed in the CDB.

Solution

Warnings in PDB_PLUG_IN_VIOLATIONS do not prevent you from actually opening the PDB in READ WRITE mode.  You can ignore WARNING messages (you cannot ignore ERROR messages).   It is okay for a PDB to have a subset (fewer) options installed than the CDB into which it is plugged.   (The reverse is NOT true, however -- the CDB must always have the same or more options as its PDBs).  
Unpublished Bug 16192980 : NO SIMPLE WAY TO CLEAN ROWS FROM PDB_PLUG_IN_VIOLATIONS AFTER DBMS_PDB CALL has been filed to request a way to clear out no-impact warnings from PDB_PLUG_IN_VIOLATIONS.  This enhancement is implemented in versions > 12.2.0.1.


Note: Do not disregard such warnings about PDB$SEED.  PDB$SEED should have all the same options as the CDB.  It should not be opened/modified by users.  Oracle tools, such as datapatch, will open/close it as needed.  You do need to address warnings of this format for PDB$SEED.