Thursday, January 16, 2020

Exadata Links

https://chriscraftoracle.wordpress.com/2018/02/09/what-makes-exadata-faster/
https://blog.pythian.com/physical-disk-cell-disk-grid-disk-and-asm-disk-in-exadata/
http://amardeepsidhu.com/blog/2019/02/18/understanding-grid-disks-in-exadata/
https://oracleracdba1.wordpress.com/2013/08/14/steps-to-shut-down-or-reboot-an-exadata-storage-cell-without-affecting-asm/
https://unknowndba.blogspot.com/2018/10/how-to-install-brand-new-exadata-x5.html
https://unknowndba.blogspot.com/2018/11/how-to-patch-exadata-upgrade-exadata-18c-part1.html
https://mindmajix.com/oracle-exadata-interview-questions
http://blog.umairmansoob.com/acceptable-hidden-parameters-on-exadata-machine/
https://blog.oracle-ninja.com/2015/07/01/haip-and-exadata/
https://rajkumar-dba.blogspot.com/2019/08/useful-exadata-ib-switches-command.html
https://kevinclosson.net/2008/09/26/oracle-exadata-storage-server-part-iii-a-faq-is-born/#comment-33012
How to change OS user password for Cell Node, Database Node , ILOM, KVM , Infiniband Switch , GigaBit Ethernet Switch and PDU on Exadata Database Machine (Doc ID 1291766.1)
Integrated Lights Out Manager (ILOM) CLI Quick Reference (Doc ID 1009715.1)

Information Center: Oracle Exadata Database Machine (Doc ID 1306791.2)
Exadata Database Machine and Exadata Storage Server Supported Versions (Doc ID 888828.1)
Oracle Exadata Best Practices (Doc ID 757552.1)
Oracle Exadata Database Machine Setup/Configuration Best Practices (Doc ID 1274318.1)
How to Configure Oracle Configuration Manager for Oracle Exadata Database Machine (My Oracle Support Doc ID 1319476.1)
Exadata Patching Overview and Patch Testing Guidelines (My Oracle Support Doc ID 1262380.1)
Oracle Exadata Database Machine exachk or HealthCheck (My Oracle Support Doc ID 1070954.1)
Exadata Health and Resource Usage Monitoring White Paper (My Oracle Support Doc ID 1920255.1)
Understanding ASM Capacity and Reservation of Free Space in Exadata (My Oracle Support Doc ID 1551288.1)
Script to Calculate New Grid Disk and Disk Group Sizes in Exadata (My Oracle Support Doc ID 1464809.1)
How to resize ASM disks in Exadata (My Oracle Support Doc ID 1684112.1)
Master Note for Oracle Database Resource Manager (My Oracle Support Doc ID 1339769.1)
Tool for Gathering I/O Resource Manager Metrics: metric_iorm.pl (My Oracle Support Doc ID 1337265.1)
Resizing Grid Disks in Exadata: Example of Recreating RECO Grid Disks in a Rolling Manner (Doc ID 1465230.1)
Create Pluggable Database using Database Link Fails with ORA-65169 ORA-17628 ORA-19505 (Doc ID 2366828.1)
Database Links: Troubleshooting ORA-2085: database link %s connects to %s (Doc ID 210630.1)
Exadata: Node or Instance evictions due to RDS connectivity issues after the DB node upgrade to 12.2.1.1.0 or higher (Doc ID 2270319.1)

How To Force Direct Path Read for SQL Statements (Doc ID 2426051.1)


Monday, January 13, 2020

How to change OS user password for Cell Node, Database Node , ILOM, KVM , Infiniband Switch , GigaBit Ethernet Switch and PDU on Exadata Database Machine (Doc ID 1291766.1)

In this Document
Goal
Solution
References

APPLIES TO:

Oracle Exadata Hardware - Version 11.2.0.1 and later
Oracle Exadata Storage Server Software - Version 11.2.1.2.0 and later
Linux x86-64

GOAL

This note explains how to change the user password for cell node, database node, ILOM, KVM, InfiniBand Switch and Cisco 4948 Ethernet Switch

SOLUTION

For more information on default user accounts on Exadata Database Machine servers and components, please refer to the Exadata Security Guide in the documentation.  
Component: Cell node
Default user accounts: root, celladmin, cellmonitor
Procedure: At the OS prompt, type "passwd" or "passwd <username>" to change the password
To prevent from registering the password in clear in the bash history, please execute just before the dcli :
export HISTIGNORE=' *'
DCLI can be used to change the password on all cells at once
Eg : dcli -g cell_group -l root "echo welcome | passwd --stdin celladmin" 
Use caution when passing special characters to the passwd command, as certain characters have shell-specific functions. Enclose the password in single quotes, as shown in the example below,
to prevent unexpected results.
echo ‘Welcome!99’ | passwd --stdin oracle
Warning : The above command will leave the desired password completely "clear" in the shell history if you didn't export HISTIGNORE before the dcli command 
The command can be executed to any account
Unset HISTIGNORE once finished
unset HISTIGNORE

Component: Database node - user accounts
Default user accounts: root, software owner account (typically "oracle" and/or "grid"), dbmadmin (image 12.1.2.x.x or later), dbmmonitor  (image 12.1.2.x.x or later)
Procedure: At the OS prompt, type "passwd" or "passwd <username>" to change the password
To prevent from registering the password in clear in the bash history, please execute just before the dcli :
export HISTIGNORE=' *'
DCLI can be used to change the password on all compute nodes at once 
Eg : dcli -g dbs_group -l root "echo welcome | passwd --stdin oracle"
Use caution when passing special characters to the passwd command, as certain characters have shell-specific functions. Enclose the password in single quotes, as shown in the example below,
to prevent unexpected results.
echo ‘Welcome!99’ | passwd --stdin oracle
Warning : The above command will leave the desired password completely "clear" in the shell history if you didn't export HISTIGNORE before the dcli command
The command can be executed to any account
Unset HISTIGNORE once finished
unset HISTIGNORE

Component: grub password
Procedure: At the OS prompt, type "grub-md5-crypt" and enter the new password at the prompt. After entering the new password twice (for confirmation), a string will be displayed. Copy that string into the copy buffer. Then find the password line in the /boot/grub/grub.conf file which will look like "password --md5 <hashed string>". Replace the <hashed string> in that line with the new string that you copied from the grub-md5-crypt output earlier. Then save the file. 

Component: ILOM
Default user accounts: root
Procedure: When logged in to the ILOM, use a command like this to reset the password (this example resets the password for the user named "user1"):

-> set /SP/users/user1 password
DCLI can be used to change the password on all ILOMs at once 
Eg : dcli -g dbs_cell_group -l root " ipmitool sunoem cli 'set /SP/users/root password=welcome' welcome "
The command can be executed to any account

Component: KVM
Default user accounts: Admin
Procedure:

- Under User Accounts select Local.
- Under “Users” click the “Admin”
- button. Fill in the values for password
- and click the “Save” button.

Documentation: Oracle® Exadata Database Machine Maintenance Guide E51951-21   - Changing Component Passwords

Component: Infiniband Switch
Default User accounts: root, ilom-admin, ilom-user, ilom-operator, and nm2user
Procedure: Logon using ssh
ssh root@<switch-name>
- check the firmware version running command "version"
  For version 1.3.* please use ILOM to change the password to avoid bug 13494021

    - ssh -l ilom-admin <switch-name>

    - set /SP/users/<username> password

  For later versions 2.0.3 and higher, please execute 

    - In the OS prompt type "passwd <username>"  (Except for ilom-admin that you need to run in the ILOM  set /SP/users/ilom-admin password)
DCLI can be used to change the password on all IB Switches at once 
a. cd /opt/oracle.SupportTools/onecommand

b. place the attached file "ibswitch_group" there

c. Verify if have equivalency with IB switches : dcli -g ibswitch_group -l hostname
       If it doesn't request password skip step d.

d. Set equivalency to switches
Run: #/opt/oracle.SupportTools/setup_ssh_eq.sh ibswitch_group root <password>
When this is done, you should now have equivalency with IB switches, so the following should work:
dcli -g ibswitch_group -l hostname
e. Change passwords for NM2USER on all switches:
dcli -g ib_switch_group -l root "echo welcome | passwd --stdin nm2user"

f. Change passwords for ROOT user on all switches:
dcli -g ib_switch_group -l root "echo welcome | passwd --stdin root"

g. Remove equivalency to switches:
dcli -g ib_switch_group -l root --unkey

h. Verify that the password change worked by logging in on a sample of switches
 Documentation: Oracle® Exadata Database Machine Maintenance Guide E51951-21 - Changing Component Passwords

Component: Cisco 4948 Ethernet Switch
There are two different methods to access the switch.  One is through a serial port and the other is through ssh.  When using the serial access, there are no user accounts, so the enable password is all that is required.  When the switch is accessed via ssh, a user account and password is needed before being able to issue the enable password.  Thus there can be two, or more passwords that can be changed: the enable password and user passwords.  During the installation of the system, the admin user is created and this user can access the switch via ssh.
In changing the user passwords, we take the extra step of "service password-encryption" to make sure the passwords are encrypted when viewing them using the "show running-config" command.  The enable password is encrypted when using the "enable secret" command.
Default user accounts: admin
To change the enable password: Access the switch using telnet, ssh, or via the serial port.  If using the serial port for access, you will not be prompted for a user name or password, you will just get the prompt.
In OEL5 update 5 or higher telnet was removed for security reason, you  may need to install telnet client package in the compute node
SSH have to be enabled in the switch following the steps described in "Configuring SSH on Cisco Catalyst 4948 Ethernet Switch" (Doc ID 1415044.1).
my_host> ssh admin@my_switch
Using keyboard-interactive authentication.
Password:
my_switch> enable
Password:
Switch# configure terminal
Enter configuration commands, one per line. End with CNTL/Z.
Switch(config)# no enable password
Switch(config)# enable secret <new password>
Switch(config)# end
Switch# write memory

To change a user password: Access the switch using telnet, ssh, or via the serial port.  If using the serial port for access, you will not be prompted for a user name or password, you will just get the prompt.

my_host> ssh admin@my_switch
Using keyboard-interactive authentication.
Password:
my_switch> enable
Password:
Switch# show running-config all | include service password-encryption
service password-encryption (if this is set to "no service password-encryption" user passwords will be in clear case.  If it is not set to "no" the )
Switch# configure terminal
Enter configuration commands, one per line. End with CNTL/Z.
Switch(config)# service password-encryption
Switch(config)# username george password <new password>
Switch(config)# end
Switch# write memory
Documentation: Oracle® Exadata Database Machine Maintenance Guide E51951-21 - Changing Component Passwords

Component: Cisco 93108-1G or 9348 Ethernet Switch
my_host> ssh admin@my_switch
User Access Verification
Password:
Switch# change-password
Enter old password:
Enter new password:
Confirm new password:
Switch# copy running-config startup-config
Switch# exit
Documentation :  Oracle Exadata Database Machine Maintenance Guide E93156-07 - Changing Component Passwords

Component: PDU
Deafult user accounts: admin
Procedure:
- Access the PDU metering unit web interface from a system on the network

- Click on the Net Configuration link and log in as an admin user

- Scroll down the page until you see the Admin/User fields

- Type in up to five users into the Admin/User fields

  Type in a name and password for each user and designate the user an admin or a user

  Note : Use only letters and numbers in user names and passwords

- Click the Submit button to set the PDU users and passwords

Documentation: Sun Rack II documentation for PDU password changes

Integrated Lights Out Manager (ILOM) CLI Quick Reference (Doc ID 1009715.1)

APPLIES TO:

Sun Fire X4500 Server - Version Not Applicable and later
Sun Fire X4140 Server - Version Not Applicable and later
Sun Blade 8000 System - Version Not Applicable and later
Sun Fire X4200 M2 Server - Version Not Applicable and later
Sun Fire X4200 Server - Version Not Applicable and later
All Platforms

GOAL

To discuss this information further with Oracle experts and industry peers, we encourage you to review, join or start a discussion in the My Oracle Support Community - Sun x86 Systems


Description

Most Oracle x86 servers implement the ILOM service processor (Integrated Lights Out Manager).
This is a combination of dedicated hardware and supporting software.

For a list of which servers support ILOM, refer to:

Which systems have ILOM/ALOM4v/ALOM/LOM/ELOM/SP or RSC ? (Doc ID 1012360.1)

NOTE: This guide is intended as a quick reference. It is not an exhaustive list of all possible command options.
The commands below are listed in a perceived order of importance, to help users immediately get 'up and running' with an ILOM-related issue.

Note: The SP web interface can be used as an alternate for most ILOM commands.

https://<ip_address_of_SP>

Documentation:

Integrated Lights Out Manager (ILOM) Administration Guide - For ILOM 1.1.1
Integrated Lights Out Manager (ILOM) Administration Guide - For ILOM 1.0
Integrated Lights Out Manager (ILOM) 2.0
Integrated Lights Out Manager (ILOM) 3.0

SOLUTION

Steps to Follow

Integrated Lights Out Manager (ILOM) CLI Quick Reference:
Introduction
ILOM uses a hierarchical namespace.
It contains a predefined tree /SP namespace manages the ILOM. e.g., to manage users and clock settings. The SP namespace is generic over all platforms using the ILOM. /SYS namespace manages the host
system -- e.g., change the host state, read sensor information, and access other information for managed system hardware. The SYS namespace is unique to each platform.
[For an example of the hierarchy see the Integrated Lights Out Manager Administration Guide].

Command Syntax
Command syntax can be separate or in combination:
Individually:
-> cd /SP/services/http
-> set port=80
Single combined command:
-> set /SP/services/http port=80
Useful ILOM CLI Commands:
Display SP firmware version:
-> version 
Show available CLI commands:
-> show /SP/cli/commands
Display help information about commands and targets
-> help 
For help specific to a command, use help followed by the command of interest, for example:
-> help start
Display status information about the controller board in your server (the command path to the board will vary within the X4000 family):
-> show /SYS/MB/P0
Connect to host serial console (host COM0):
-> start /SP/console 
Power on host:
-> start /SYS
Power off host:
-> stop /SYS
Reset host:
-> reset /SYS
Reset ILOM:
-> reset /SP
Resetting the ILOM and BIOS Passwords: 

Requires changing a hardware jumper within the server enclosure
Exit the ILOM CLI:
 -> exit
Send break to the host:
 Escape + B (press the Escape key and type upper case B)
Start the server console:
 -> start /SP/console
Exit the server console (escape key plus an opening bracket '(' ):
 ->  (
List users with open sessions to the system console (who is using the console?):
 -> show /SP/sessions
Terminate a server console session started by another user:
 -> stop /SP/console
Display SEL (System Event Log)
 -> show /SP/logs/event/list
Clear all System Event logs:
 -> set /SP/logs/event clear=true
Locate LED - a white LED to help find a server.
Enable locate LED:
 -> set /SYS LOCATE=on
Disable locate LED:
 -> set /SYS LOCATE=off
Configuring a Static IP Address
Set the working directory:
 -> cd /SP/network
Specify a static Ethernet configuration:
 -> set pendingipdiscovery=static
 -> set pendingipaddress=xxx.xxx.xx.xx
 -> set pendingipnetmask=yyy.yyy.yyy.y
 -> set pendingipgateway=zzz.zzz.zz.zzz
 -> set commitpending=true
Display the targets in SYS:
 -> show /SYS
/SYS Targets:
INTSW
BIOS
SP
REAR_SVC
TOP_SVC
TEMP_FAULT
POWER
LOCATE
SERVICE
V_+12V
V_+1V2
Display the targets with the /SYS/SASBP ? disk backplane:
 -> show /SYS/SASBP
/SYS/SASBP
Targets:
ID0
ID1
T_AMB
HDD0
HDD1
HDD2
HDD3
Properties:
type = Disk Backplane
Commands:
cd show
Add a local user account:
 -> create /SP/users/username password=password role=[administrator|operator]
Delete a User:
 -> delete /SP/users/username
Displaying Users:
 -> show /SP/users
Change the role of user1 to operator
 -> set /SP/users/user1 role=operator
Display the role of username 'user1' (the role will clearly impact which command functionality is available for a user):
 -> show /SP/users/user1
Change user1's password:
 -> set /SP/users/user1 password
Changing password for user /SP/users/user1/password...
Enter new password:********
Enter new password again:********
New password was successfully set for user /SP/users/user1
ILOM has two serial ports: an internal host port that interfaces directly with the host server using the start /SP/console command, and an external port that is exposed on back of the server.
Display serial port settings (on back of server):
 -> show /SP/serial/external
Display settings for the host serial port (internal):
 -> show /SP/serial/host
Change speed (baud rate) for host serial port:
 -> set /SP/serial/host pendingspeed=57600 commitpending=true
Display network settings:
 -> show /SP/network
Change the IP address of ILOM:
 -> set /SP/network ipaddress=nnn.nn.nn.nn commitpending=true
Change HTTPS settings:
 -> set /SP/services/https port=portnumber servicestate=[enabled|disabled]
Change HTTP settings, such as enabling automatic redirection to HTTPS:
 -> set /SP/services/http port=portnumber secureredirect=[enabled|disabled] servicestate=[enabled|disabled]
Display clock settings:
 -> show /SP/clock
Configure clock to synchronize with NTP server:
 -> set /SP/clients/ntp/server/1 address=nnn.nnn.nn.nn 
To disable use of NTP set the NTP-server IP address to none as show below:
 -> set /SP/clients/ntp/server/1 address=none 
Enable NTP service:
 -> cd /SP/clock
-> set usentpserver=enabled

Check NTP service:
There are no commands from the ILOM itself to confirm that NTP is functioning, however, from a Solaris host you can query the ILOM and confirm that it has connected to a timesource:
$ ntpq -p x123-sp.yourdomain.com
remote   refid  st   t   when   poll  reach  delay  offset  jitter
==================================================================
*domain-rtr-1-v5 nnn.nn.nnn.nnn 3 u 771 1024 377 1.339 1.487 0.244

Upgrade ILOM Firmware:
 -> load -source tftp://archive/newmainimage
Are you sure you want to load the specified file (y/n)? y
File upload is complete.
Firmware image verification is complete.
Do you want to preserve the configuration (y/n)? n **
Updating firmware in flash RAM:
.
Firmware update is complete.
ILOM will not be restarted with the new firmware.
** If you wish to preserve the platform configuration, please enter a 'y' at the appropriate prompt above. Not doing so will reset the system firmware configuration to default.
When preserving the platform configuration, if you experience errors such as 'Unable to successfully parse XML input', this is due to the directory you are in when attempting an ILOM firmware update.
Using the directory: /SP/config causes the issue listed above due to a conflict in the restore location. Other errors may show as a symptom. This happens when a restore config is attempted.
To avoid this conflict, execute the load command from anywhere (/ or /SP or /SYS etc.) except /SP/config.
See Bug: 15702754 : SUNBT7027523 FW UPGRADE AND RESTORE ILOM CONFIG USES LOAD COMMAND WHICH IS MISLEADING.

Display configured alerts:
 -> show /SP/alert/rules 
Display alert configuration rule in detail:
 -> show /SP/alert/rules/N (where N is 1 to 15)
Configure an alert:
 -> set /SP/alert/rules/1 destination=nnn.nnn.nn.nn level=critical
Change an alert level to critical:
 -> set /SP/alert/rules/1 level=critical
Disable an alert:
 -> set /SP/alert/rules/1 level=disable
Send a test alert for all enabled rules:
 -> set /SP/alert/rules testalert=true

Friday, January 10, 2020

How to Read Linux Top Command Output and Uses

Understanding Linux top command results. As a Linux system administrator, the top command is a frequently used command and our daily tasks we used multiple times this commands to view resource utilization by processes on the server. This command helps us to find which process is utilizing what resources of the system.
Using this article, I am trying to write to how to use to command and understand the results of top command on the Linux system

How to Read Linux Top Command Output

When you execute the top command on Linux, it shows a lot of results, here I am trying to show you to how to read it row by row.

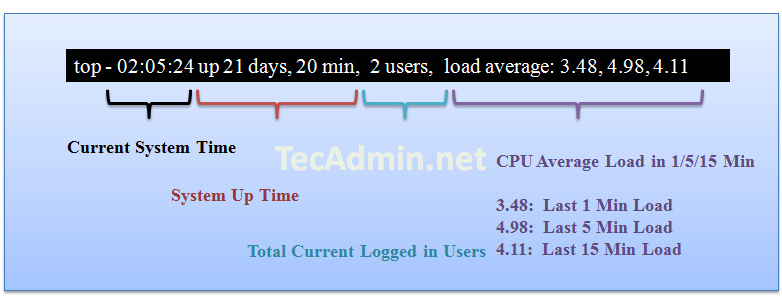
Result Row #1

Row 1 results show about server uptime from the last reboot, currently logged in users and CPU load on the server. The same output you can find using Linux uptime command.
Linux top command result line 1

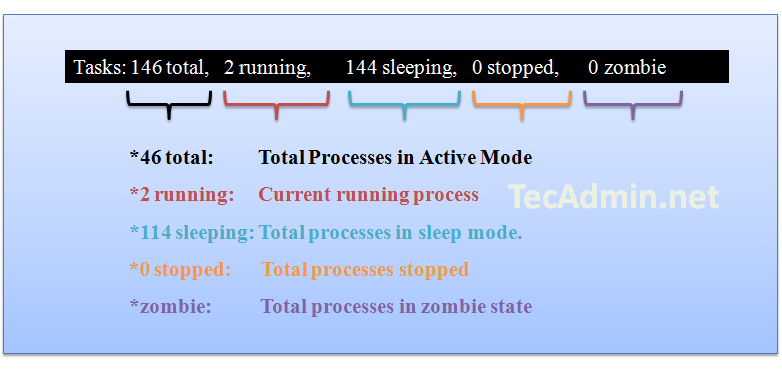
Result Row #2

Row 2 shows the number of process running on the server and their state.
Linux top command result line 2
Zombie process or defunct process is a process that has completed execution but still has an entry in the process table. This entry is still needed to allow the parent process to read its child’s exit status.

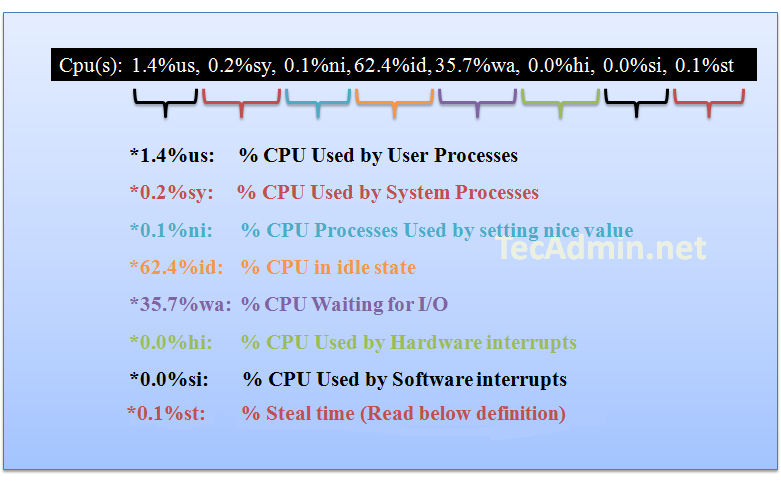
Result Row #3

Row three shows the CPU utilization status on the server, you can find here how much CPU is free and how much is utilizing by the system.
Linux top command result line 3
Steal time is the time that a virtual CPU waits for a real CPU while the hypervisor is servicing another virtual processor.
Definition from access.redhat.com

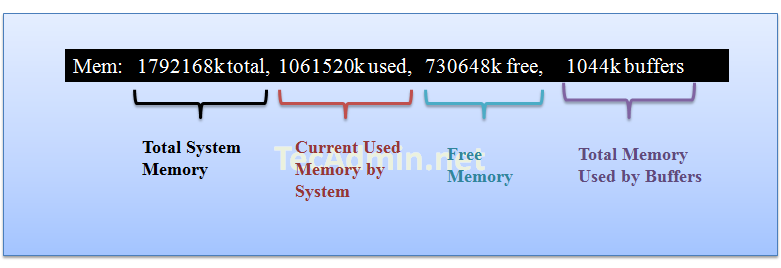
Result Row #4

Row 4 shows the memory utilization on the server, you can find here how much memory is used, the same results you can find using free command.
Linux top command result line 4

Result Row #5

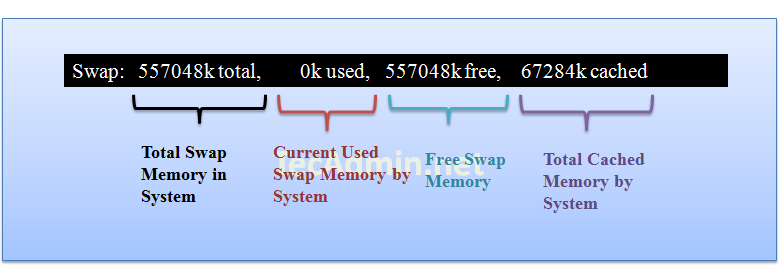
Row 5 shows the swap memory utilization on the server, you can find here how much swap is being used, the same results you can find using free command.
Linux top command result line 5

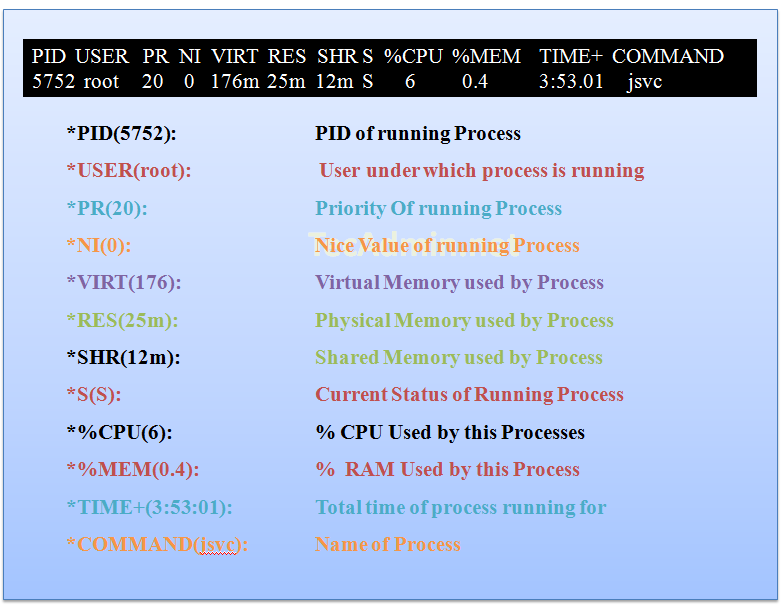
Result Row #6 ( Running Processes )

In this steps you will see all running process on servers and there additional details about them like below.
Linux top command result line 6

Short Results Based on Specific Fields

You can also sort the results based on the specific field. Use the following key combination to do short.
Press "SHIFT + F" and Select your choice below and press ENTER.

  A     ( PID = Process Id )
  b     (  PPID   = Parent Process Pid )
  d     (  UID= User Id )
  e     (  USER   = User Name )
  f     (  GROUP  = Group Name )
  g     (  TTY= Controlling Tty )
  h     (  PR = Priority )
  i     (  NI = Nice value )
  j     (  P  = Last used cpu (SMP) )
  k     (  %CPU  = CPU usage )
  l     (  TIME  = CPU Time )
  n     (  %MEM  = Memory usage (RES) )
  o     (  VIRT  = Virtual Image (kb) )
  p     (  SWAP  = Swapped size (kb) )
  q     (  RES= Resident size (kb) )
  r     (  CODE  = Code size  (kb) )
  s     (  DATA  = Data+Stack size (kb) )
  t     (  SHR= Shared Mem size (kb) )
  w     (  S  = Process Status )
  x     (  COMMAND= Command name/line )

Thank you for reading this port, If this port is helpful for you, please do not forgot to share it. If you have any suggestions please put your comments below.

Monday, December 30, 2019

Database Alert.log or ASM Alertlog File Showing Wrong Date or Wrong Datetime or Wrong time (Doc ID 1557371.1)


APPLIES TO:

Oracle Database - Enterprise Edition - Version 10.2.0.1 and later
Oracle Database Cloud Schema Service - Version N/A and later
Oracle Database Exadata Cloud Machine - Version N/A and later
Oracle Cloud Infrastructure - Database Service - Version N/A and later
Oracle Database Exadata Express Cloud Service - Version N/A and later
Information in this document applies to any platform.

GOAL

To solve the issue of wrong datetime or wrong time in the Database Alert.log or ASM Alertlog file showing on RAC/Grid/Standalone environment
May not have any issue with sysdate systimestamp.
Most of the time, this issue is seen after recent server reboot

SOLUTION

 The time used for the message in the alertlog is the same as "sysdate" for the process that is writing to the alert.log. Alert.log messages are not written by "Oracle" they are written by the Oracle process that is responsible for that error/message (including user sessions, ASM processes, or any other background processes). This has nothing to do with the database timezone, session time etc. So one has to check the OS level TZ settings and Grid/Cluster level Timezone settings, if those are proper, because in some situations incorrect timezone on RAC and Grid may also causes the wrong datetime in alert.log
Possible Action plan is to go through the entire Note 227334.1 and Note 340512.1 check the timezone and date settings are proper.
Please refer the section "My Alert.log has wrong time for some or all entry's" in the Note 227334.1 present in the References Section
Please refer the section "How do I see & set the TZ environment variable in a RAC environment" in the Note 227334.1
Please refer the section "How to see and define the timezone when using Grid Infrastructure (start the database using crsctl )?" in the Note 227334.1
Please refer the section "How to define the timezone for ASM logging (including ASM messages in the alert.log of the database)?" in the Note 227334.1
Sometimes this issue can happen with the listener and database time may not match, as explained in the Note Note 227334.1 in section "My Alert.log has wrong time for some or all entry's", In that case you can follow the below action plan
shutdown listener
shutdown database
set ORACLE_HOME and ORACLE_SID properly
check and set the OS level TZ settings
then start the database
then start the listener
Please go through the entire Note 227334.1 and Note 340512.1 check the timezone and date settings are proper.
If you are in the RAC/CRS/GRID Infrastructure, Please also follow the Notes below
Note 1390015.1   Incorrect SYSDATE shown when connected via Listener in RAC
Note 1209444.1   How To Change Timezone for 11gR2 Grid Infrastructure

Incorrect SYSDATE shown when connected via Listener in RAC (Doc ID 1390015.1)


APPLIES TO:

Oracle Database Exadata Cloud Machine - Version N/A and later
Oracle Cloud Infrastructure - Database Service - Version N/A and later
Oracle Database Cloud Exadata Service - Version N/A and later
Oracle Database Exadata Express Cloud Service - Version N/A and later
Oracle Database Cloud Schema Service - Version N/A and later
Information in this document applies to any platform.
Affected Database: Oracle

SYMPTOMS

  • Incorrect SYSDATE shown when connected via listener
     
  • Restart of database and listener did not help
      
  • OS defined TZ timezone setting is correct, but still not picked up by listener

CAUSE

- Listener might have a different Envs variable setting for Timezone

- Listener is started by LSNRCTL instead of SRVCTL or vice versa

- PMON only reads the OS environment variables when the database is started. If TZ is changed after the database is started PMON will not pick up the changed value.

When dynamic database service registration is enabled to a listener, PMON both registers the service name and also the environment variables for the database associated with that service name. This means that connections via the dynamically registered service handler will continue to use the old TZ timezone setting.
If the listener is restarted and also has a static service registration, connection via the listener will use the TZ set in the listener until PMON first re-registers the service handler again. When the listener has two service registrations, one static and one dynamic, then the dynamic one will be used.

SOLUTION

For 11.2.0.2 and above the TZ entry in $GRID_HOME/crs/install/s_crsconfig_<nodename>_env.txt sets to correct time zone! This enables resources started under the Grid Infrastructure home (listener, databases) using the timezone set in here and so has no requirement anymore to set TZ for DB and listener via setenv. For more details see: How To Change Timezone for 11gR2 Grid Infrastructure ( Document 1209444.1)

1) Check the environment variables set for database and listener in your CRS configuration
srvctl getenv database -d <dbname>
srvctl getenv nodeapps -n <nodename>
-- If you are 11.2, then use 'getenv listener' instead of 'getenv nodeapps':
srvctl getenv listener

2) Check the current environment variables used for PMON and Listener

Refer: How to Check the Environment Variables for an Oracle Process Document 373303.1

3) Compare and if required set the TZ setting with the above
Note: On HP-UX, if TZ is not present, then the value (default: EST5EDT) contained in /etc/default/tz is used. Also see Document 1209444.1 to check timezone current settings on the OS.


4) If required set the correct TZ value for the database via SRVCTL as follows
srvctl setenv database -d <dbname> -t 'TZ=<the TZ you want>'
srvctl setenv nodeapps -n crmnode1 -t 'TZ=<the TZ you want>'
-- If you are 11.2, then use 'setenv listener' instead of 'setenv nodeapps':
srvctl setenv listener -l <listenername> -t 'TZ=<the TZ you want>'

5) Restart the CRS

6) Start the database instance and listener via SRVCTL.
Restarting the database instances will lead to re-registration of the services and the environment variables to the listener.

REFERENCES

NOTE:1531653.1 - How to use multiple timezones with one Oracle RAC database
NOTE:227334.1 - Dates & Calendars - Frequently Asked Questions
NOTE:373303.1 - How to Check the Environment Variables for an Oracle Process
NOTE:1209444.1 - How To Change Timezone for Grid Infrastructure
BUG:18967747 - DATABASE TIMEZONE IS 16 HOURS AHEAD OF OS TIME WHEN CONNECTED VIA LISTENER